- Eren Olgun
- Feb 1, 2025
- 15 min read

Oracle 19c Single Instance Database Installation

Hi,
In this blog post, we will examine in detail how to install the Oracle 19c database. Before we move on to the installation, we will need a virtual server that we will use during the installation. At this point, if you do not already have a server installed, you can install a virtual server by reviewing the blog post titled Oracle Linux 8.10 Installation using a Virtual Server (VirtualBox) that I have shared before and following the steps one by one.
If you already have a server and after checking whether this server meets the minimum requirements below, you can continue with the Oracle 19c database installation.
Linux operating system (preferably Oracle Linux)
4GB or more RAM
30GB or higher disk space
If our server to be used at the database installation point is ready, we can start the installation of the Oracle 19c Single Instance database.
1. Preparations
We need to download the installation file we need for Oracle 19c database installation from Oracle's website. Since Automatic Storage Management (ASM) will not be used when setting up the database, we will only need to download the database installation file. You can download the Oracle 19c installation file, which will be used in the following steps, using this link.
On the page that opens, you should continue by selecting the ZIP option next to the "Oracle Database 19c for Linux x86-64" field under the "Oracle Database Enterprise Edition" heading. You will need an Oracle account to download the installation file. If you do not already have an account, you can create an account or log in to your existing account and download the file named "LINUX.X64_193000_db_home.zip" for use.
2. Operating System Preparation
The server to be used for installation must be logged in and the existing packages on the server must be updated. This operation can be performed with root privileges or directly with the root user. On the operating system splash screen, "Not listed?" option is selected and continued by typing "root" in the "Username" section on the screen that opens. On the password screen, you can log in to the server with the password we set for the root user during the operating system installation.


When you successfully log in with the user, you can proceed by confirming all the steps with the buttons at the top right on the welcome screen that will appear.

Then, on the server we opened, click on the "Activities" button in the upper left corner, then click on the "Type to search" section on the page that opens, then type "terminal" and a new terminal application will open.


From the opened terminal application, we can see which user we are logging in with and what authority we have on the terminal. The first part of the text in the "[root@localhost ~]#" section at the beginning of the first line on the terminal screen, that is, the "root" part, shows the current logged in user. The "localhost" part indicates the name of the server. The "~" part refers to the current directory in the terminal. The term "~" usually refers to the "/root" directory for the "root" user and the "/home/username" directory for regular users. Additionally, the "#" sign at the end shows that we have root authority in the terminal. If we had logged in as a normal user without root privileges, the "$" sign would have appeared in this section.
Some commands used on the Linux side are allowed to be run only by authorized users. At this point, we can prevent a possible error by paying attention to which user the statements run in the terminal are run with. In the rest of the article, I will be careful to specify which authority and user will run each terminal command.
First of all, the latest version updates of all installed packages on the operating system are made.
[root@localhost ~]# yum -y update

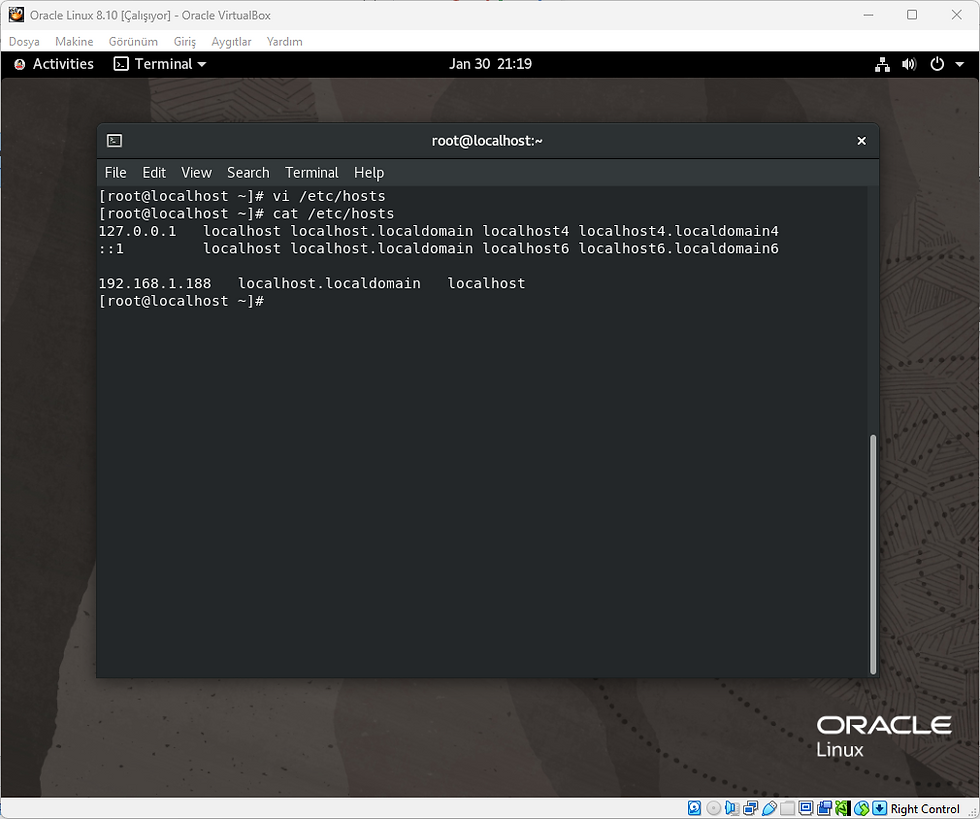
After the packages are updated, server IP and hostname information is added to the "/etc/hosts" file. The main purpose of adding server IP address and hostname information to this file is to ensure that the network configuration works properly and the local analysis required by Oracle Database occurs smoothly.
To find out the server IP, first run the following command.
[root@localhost ~]# ifconfig

Afterwards, the following command is run to find out the server hostname information.
[root@localhost ~]# hostname

If there is no domain information used on the system and this is not set in the server installation in the hostname information returned after the command, we can continue by adding any general domain name to the end. Hostname information that does not have this domain name indicates that the system is not using a fully qualified domain name called Fully Qualified Domain Name (FQDN). It is used to determine the hostname information with the full domain name and to uniquely identify this hostname in a larger and more comprehensive network. Using an artificial domain name for a hostname that is not a full domain name does not cause any problems, since this resolution is based only on the "/etc/hosts" file and is not sent to DNS.
In line with this information obtained, the "/etc/hosts" file is opened and edited with the "vi" command. The format "<SERVER_IP> <FULLY_QUALIFIED_DOMAIN_NAME> <HOSTNAME>" is added to the bottom line of the file.
[root@localhost ~]# vi /etc/hosts
After these adjustments, the "Secure Linux (SELinux)" feature will be disabled. SELinux's strict security policies may conflict with some of Oracle's components and cause the installation to fail. Because SELinux controls access to file system and network resources, access to certain directories or ports required by Oracle can be restricted. Additionally, SELinux's constant monitoring and auditing of application processes can negatively impact the performance of the Oracle database.
The "/etc/selinux/config" file is opened with "vi" and the "SELINUX=enforcing" line in this config file is updated to "SELINUX=disabled".
[root@localhost ~]# vi /etc/selinux/config

After disabling Secure Linux, the Firewall service is also stopped and inactivated. The reason for this is that sometimes the Firewall may block access to certain ports required for the Oracle database to work. Oracle Database uses specific ports (for example, port 1521) to communicate between clients and servers over the network. If access to these ports is restricted by the firewall, connections may fail and the database cannot function properly.
[root@localhost ~]# systemctl status firewalld.service
[root@localhost ~]# systemctl stop firewalld.service
[root@localhost ~]# systemctl disable firewalld.service
[root@localhost ~]# systemctl status firewalld.service


3. Oracle Database Installation Preparation
The "oracle-database-preinstall-19c" preparation package is installed to automatically configure the required system settings and dependencies before installing Oracle Database 19c. This package facilitates all the preliminary preparations required for the proper installation and operation of Oracle Database on Oracle Linux. It creates the "oracle" user and the "oinstall" and "dba" groups on the server. In addition, it automatically defines the kernel parameters needed by Oracle Database in the "/etc/sysctl.conf" file, and many user limits such as process limits in the "/etc/security/limits.conf" file.
[root@localhost ~]# yum install -y oracle-database-preinstall-19c

After the installation of the 19c preinstall package, the password of the oracle user created by the package is determined with the following command. After typing the password we have determined twice, the password of the oracle user will be changed.
[root@localhost ~]# passwd oracle

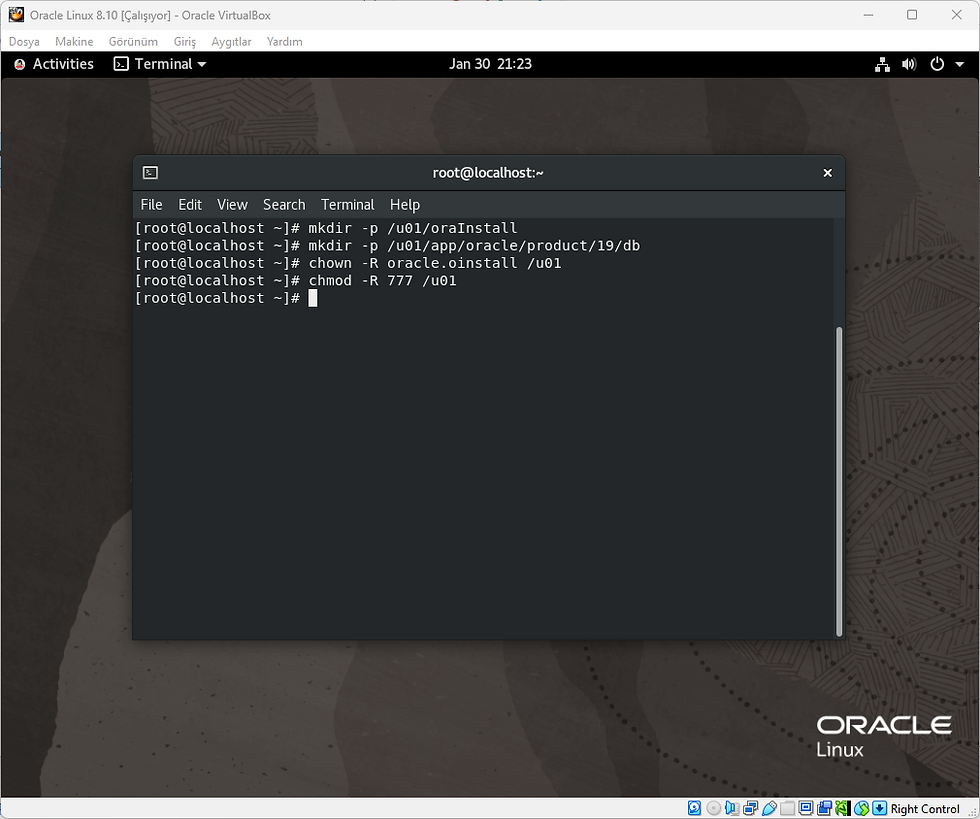
After the Oracle user's password is changed, the file directories that will be used for database installation are created and the permissions of these created files are defined for the Oracle user.
[root@localhost ~]# mkdir -p /u01/oraInstall
[root@localhost ~]# mkdir -p /u01/app/oracle/product/19/db
[root@localhost ~]# chown -R oracle.oinstall /u01
[root@localhost ~]# chmod -R 777 /u01
In the next step, we will transfer the installation file we downloaded in the first step to our server. We have two options at the transfer point. The rest of the article has been prepared based on the second step.
You can create a public folder that VirtualBox will see and put the file you downloaded to your own computer into that folder. You can then copy this file to the "/u01/oraInstall" directory.
You can skip the file transfer processes by downloading the file on Oracle Linux 9.4 operating system.
To download the file, first click on the "Activities" button in the upper left corner, then click on the "Type to search" section on the page that opens, then type "firefox" and a new browser will open. In the opened browser, search for "Oracle 19c download" in the search section and go to the "Oracle Database 19c Download for Linux x86-64" page that appears in the search results. On the new page that opens, click on the download link named "LINUX.X64_193000_db_home.zip". After you log in to your Oracle account, the file downloading process begins.

After the file is downloaded, go to the terminal screen again and move the downloaded file to the "/u01/oraInstall" directory by executing the following commands.
[root@localhost ~]# cd Downloads/
[root@localhost Downloads]# mv LINUX.X64_193000_db_home.zip /u01/oraInstall

After transferring the file named "LINUX.X64_193000_db_home.zip" to the "/u01/oraInstall" directory, we need to update the permissions on the file to be specific to the "oracle" user with the following commands.
[root@localhost ~]# cd /u01/oraInstall
[root@localhost oraInstall]# chown -R oracle.oinstall LINUX.X64_193000_db_home.zip
[root@localhost ~]# chmod -R 777 LINUX.X64_193000_db_home.zip

After the necessary folders and permissions are set, the "oracle" user is switched and the profile file is created. This profile file is used in database management systems such as Oracle Database to automatically load certain system variables and configurations when users log in. Specifically, environmental variables such as "ORACLE_HOME", "ORACLE_SID" are added to this file during Oracle installation. In this way, every time a user logs in, the necessary environment settings are automatically applied for the database to function correctly. Thus, the configurations required for database operations are constantly provided without the need for manual intervention.
[root@localhost ~]# su - oracle
[oracle@localhost ~]$ vi .profile_db
Let's update the profile file content as follows.
ORACLE_HOSTNAME=localhost.localdomain; export ORACLE_HOSTNAME
ORACLE_SID=orcl; export ORACLE_SID
ORACLE_UNQNAME=orcl; export ORACLE_UNQNAME
ORACLE_BASE=/u01/app/oracle; export ORACLE_BASE
ORACLE_HOME=/u01/app/oracle/product/19/db; export ORACLE_HOME

TMP=/tmp; export TMP
TMPDIR=$TMP; export TMPDIR

PATH=$ORACLE_HOME/bin:$PATH:$HOME/bin:/usr/sbin; export PATH
LD_LIBRARY_PATH=$ORACLE_HOME/lib:/lib:/usr/lib; export LD_LIBRARY_PATH
CLASSPATH=$ORACLE_HOME/JRE:/$ORACLE_HOME/jlib:$ORACLE_HOME/rdbms/jlib; export CLASSPATH

We add the created ".profile_db" file as ". .profile_db" under the "User specific environment and startup programs" line in the ".bash_profile" file.
[oracle@localhost ~]$ vi .bash_profile

The reason why we added the ".profile_db" file to the ".bash_profile" file is that the ".bash_profile" file is run when a user starts a login shell session. ".bash_profile" is a configuration file that is automatically loaded when the user logs in, and anything defined therein applies throughout the user's session.
After making these adjustments, we will extract the Oracle Database 19c ZIP installation file we downloaded to the "/u01/app/oracle/product/19/db/" directory. To do this, the following commands are run one by one.
[oracle@localhost ~]$ cd /u01/oraInstall
[oracle@localhost oraInstall]$ unzip LINUX.X64_193000_db_home.zip -d /u01/app/oracle/product/19/db/

4. Oracle Veritabanı Software Installation
After unziping the installation file to the specified database directory, we need to run the "runInstaller" file located in the "/u01/app/oracle/product/19/db" folder to install the database software. Let's start the installation of the database software by proceeding with the commands below.
[oracle@localhost ~]$ cd /u01/app/oracle/product/19/db
[oracle@localhost db]$ ./runInstaller

ERROR: Unable to verify the graphical display setup. This application requires X display. Make sure that the xdpyinfo exist under PATH variable.

No X11 DISPLAY variable was set, but this program performed an operation which requires it.
This error we receive is caused by not configuring the required X11 graphical environment in the system while running an application that requires Oracle Database installation or a similar graphical interface. To run graphics-based tools like Oracle's installation wizard, the X11 DISPLAY variable must be set correctly and the graphical display must be configured properly. At this point, when we log out of the session we opened with the root user and log in to the system with the oracle user, this variable will be set correctly.
To perform this operation, click on the power icon in the upper right corner and select the "Switch User..." option in the detail of the "Power Off / Log Out" option. Then, the "oracle" user is selected in the area where the users are listed and the server is logged in with the password we determined before.


After logging in with the Oracle user, we can run the "runInstaller" file again, located in the "/u01/app/oracle/product/19/db" folder.
[oracle@localhost ~]$ cd /u01/app/oracle/product/19/db
[oracle@localhost db]$ ./runInstaller

After running the command, you may see an error like "[INS-08101] Unexpected error while executing the action at state: 'supportedOSCheck'" in the installation interface that appears on the screen.

What we need to do to overcome this error is to go to the "/u01/app/oracle/product/19/db/cv/admin/" directory and add the "CV_ASSUME_DISTID=OEL7.9" parameter to the file named "cvu_config" there. After performing these steps, we can continue our installation without any errors.
[oracle@localhost ~]$ cd /u01/app/oracle/product/19/db/cv/admin/
[oracle@localhost db]$ vi cvu_config

CV_ASSUME_DISTID=OEL7.9

After making this configuration change, we can run the "runInstaller" file located in the "/u01/app/oracle/product/19/db" folder again.
[oracle@localhost ~]$ cd /u01/app/oracle/product/19/db
[oracle@localhost db]$ ./runInstaller
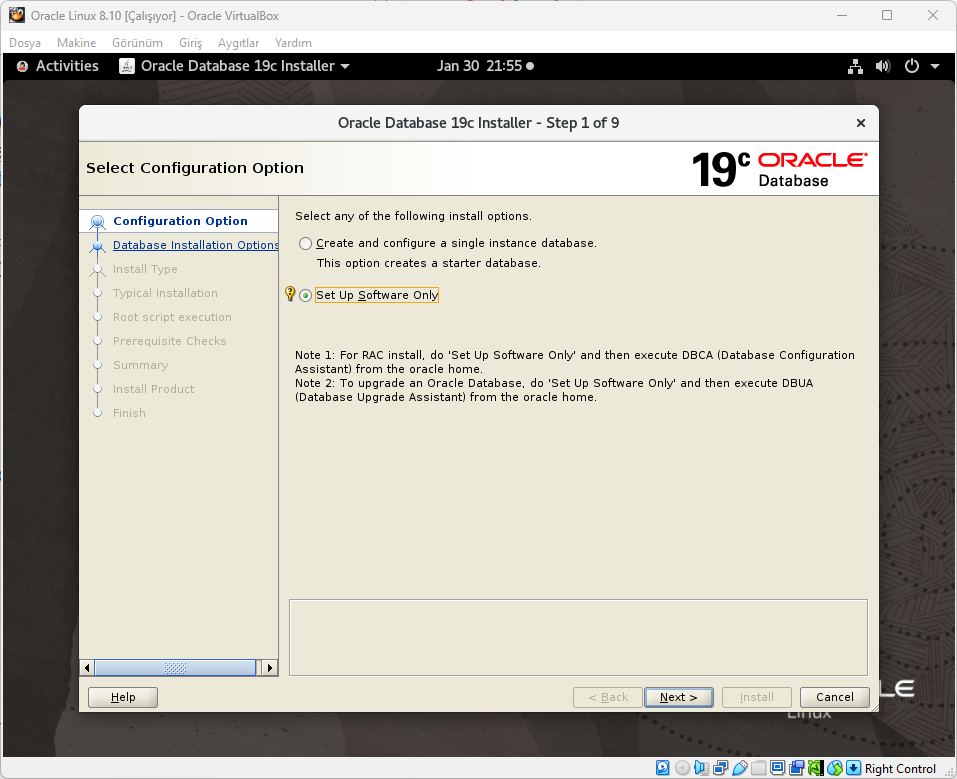
Since we will only install the software on the first screen that opens, we need to continue by selecting the "Set Up Software Only" option.

When the installation wizard first opens, buttons that should normally appear may not be visible on your screen due to screen size errors. To overcome this problem, we need to download the plug-in named "VirtualBox Extension Pack" by using this link, indicated by the red box below, using the "Accept and download" button and install it on our virtual server.

To install the plugin, we first turn off our virtual server. Then, we start the installation by double-clicking on the file named "Oracle_VirtualBox_Extension_Pack-7.1.4" that we downloaded. We continue by clicking "Install (Yukle)" on the warning panel that appears in the Oracle VirtualBox application.

After scrolling to the bottom of the subsequent conditions page, we complete the installation by clicking on the active "I accept (Kabul Ediyorum)" button.

After the installation is completed, we select our virtual server and open the "Settings (Ayarlar)" option at the top. In the panel that appears, we select the "Screen (Ekran)" option. The "Graphics Controller (Grafik Denetleyicisi)" option located in the "Display (Ekran)" panel will come with the "VMSVGA" option. We update this option with the "VBoxVGA" option and save the changes with the "OK (Tamam)" button at the bottom.

After completing the plugin installation and defining the updates, let's open the server again and log in with the "oracle" user. After this stage, we can continue the installation of the database software. We can re-run the "runInstaller" file located in the "/u01/app/oracle/product/19/db" folder.
[oracle@localhost ~]$ cd /u01/app/oracle/product/19/db
[oracle@localhost db]$ ./runInstaller
After the installation panel appears, we open the "View (Gorunum)" button on the top tab and select the "Automatic Resize Guest Screen (Misafir Ekranını Otomatik Yeniden Boyutlandır)" option. Then we size the screen so that the buttons are visible.

Since we will only install the software on the first screen that opens, we select the "Set Up Software Only" option and continue with the "Next" button.
On the next page, since we will install a single database server, we select the "Single instance database installation" option and continue with "Next".

On the next page, "Enterprise Edition" should be selected. We continue with "Next" without making any changes.

On the next page, the main folder of the database and the folder where the installation will be made are specified. After making sure these are correct, we continue with "Next".

We continue on the next page by clicking "Next" without making any changes.

On the next page, the groups to be used when performing database operations are selected. Here we continue with "Next" without changing anything.

At the next stage, there are some scripts that need to be run while the software is installed. While we can run them manually, we can also make them work automatically. To make it run automatically, we activate the "Automatically run configuration scripts" option and enter the password I set for the "root" user and continue with the "Next" button.

Afterwards, a requirements check is performed before installation. At this point, we should not receive any errors unless a mistake is made in the steps. After the installation is completed, we complete the installation of the database software by selecting the "Install" button on the page that appears.


After the installation progresses a little, a warning appears about scripts that must be run with the "root" user. We continue the installation by saying "Yes" to this warning.

Once the scripts are run, the installation is completed successfully. We exit the installation screen by using the "Close" button. In the next step, we will start installing the Oracle database.

5. Oracle Database Installation
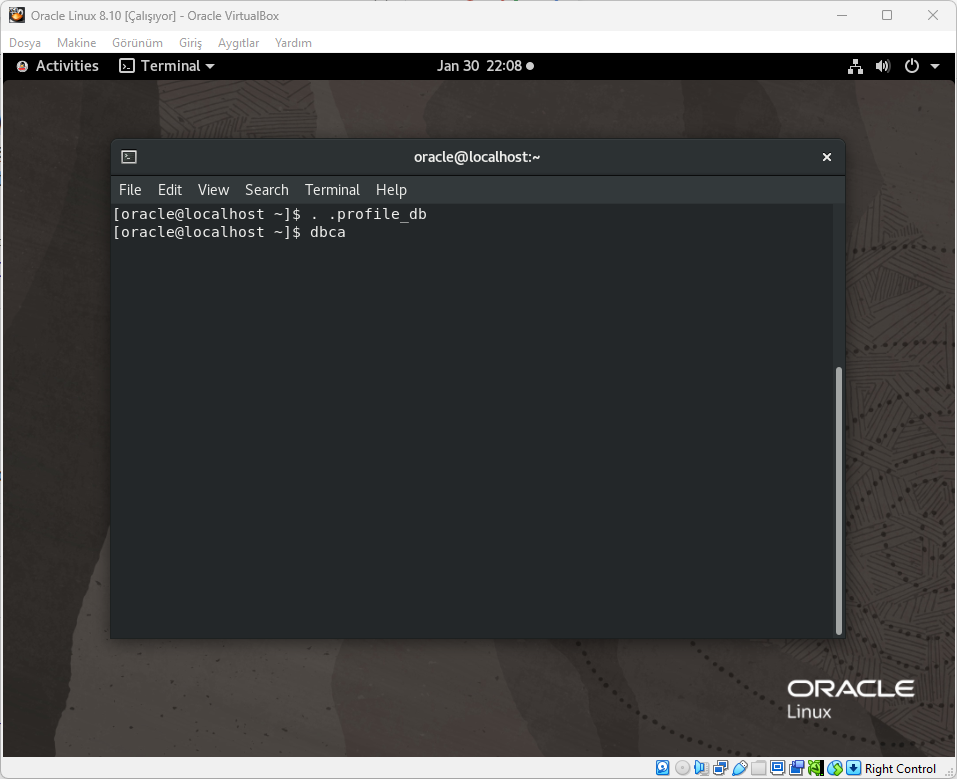
After successfully installing the Oracle database software, we start creating the database using DBCA (Database Configuration Assistant). We come to terminal and activate profile with the ". .profile_db" command. Then, we start the database configuration screen with the "dbca" command.
[oracle@localhost ~]$ . .profile_db
[oracle@localhost ~]$ dbca
On the first screen that opens, only the "Create a database" and "Manage templates" options are active since there is no database pre-installed on our server. In this step, we start our installation with the "Create a database" option.

On the next configuration page, we continue with the "Advanced configuration" option.

On the next page we select the database installation type. We leave the "Database type" option as "Oracle Single Instance database" and the "Template name" option as "General Purpose of Transaction Processing" and continue with the "Next" button.

On the next page, we will be making the installation settings to customize our database. At this point, we need to make sure that the adjustments we make match the information in the profile file that we determined during the database installation preparation phase. We fill in the "Global database name" section and the "SID" section with "orcl" to be the same as the information in the profile file I specified.
Additionally, since we will not use any Container database, we deactivate the "Create as Container database" option and continue with "Next".

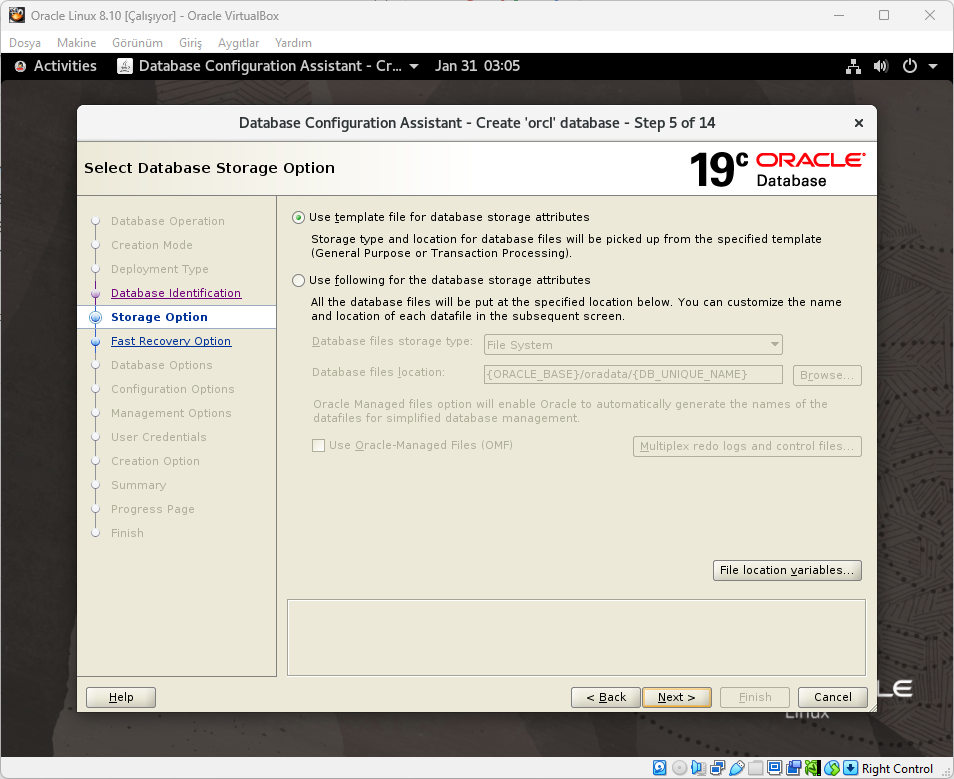
After determining the database global name and SID, we set the storage option of the database. On the next page, select "Use template file for database storage attributes" and click "Next".
Since we will not set any recovery options on the database, we go to the next page with the "Next" button without activating any options on the "Fast Recovery Option" page.

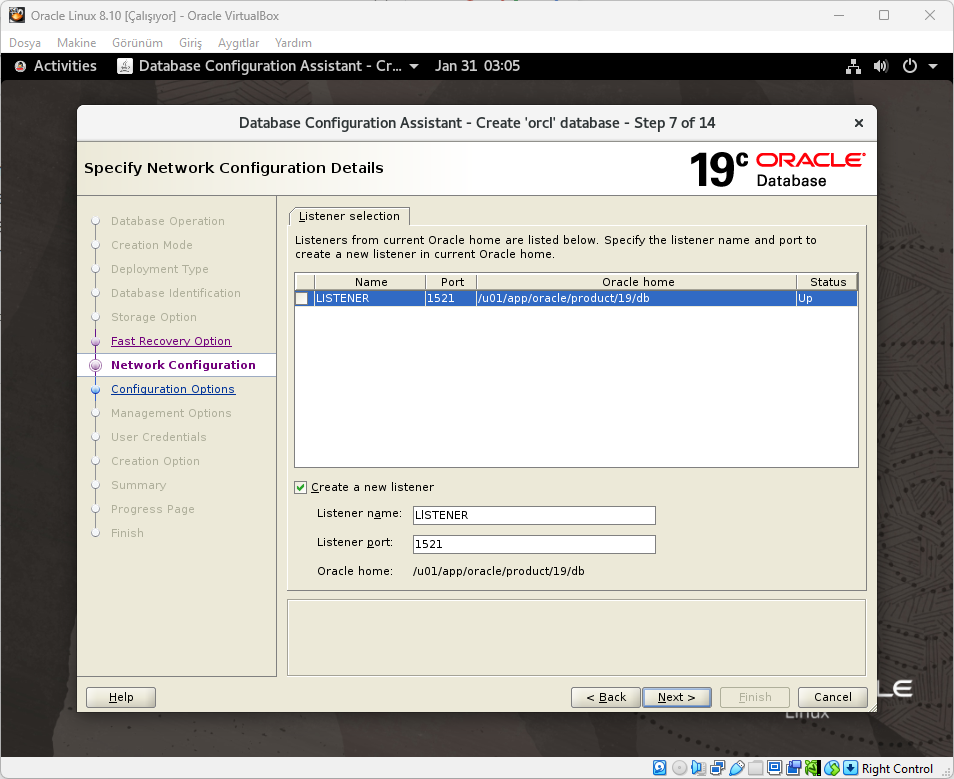
On the next page we create a listener for our database. We activate the "Create a new listener" option here. We write "LISTENER" in the "Listener name" option. We also write "1521" in the "Listener port" section and continue by clicking the "Next" button.
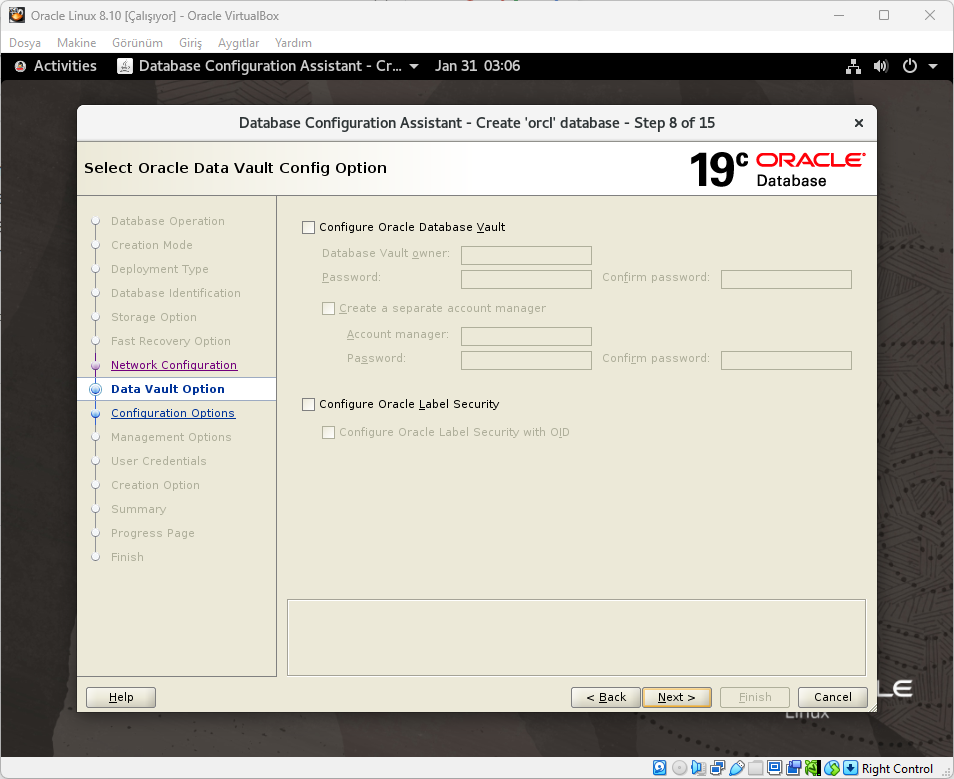
Since we will not activate any security options on our database, we continue with the "Next" button without activating any options on the "Data Vault Option" page.
When we continue the installation, we go to a detailed page titled "Configuration Options". First of all, in the "Memory" section, we select the "Use Automatic Shared Memory Management" option and do not change the "SGA size" and "PGA size" options that come automatically. These sections will be determined automatically according to the server features you set.
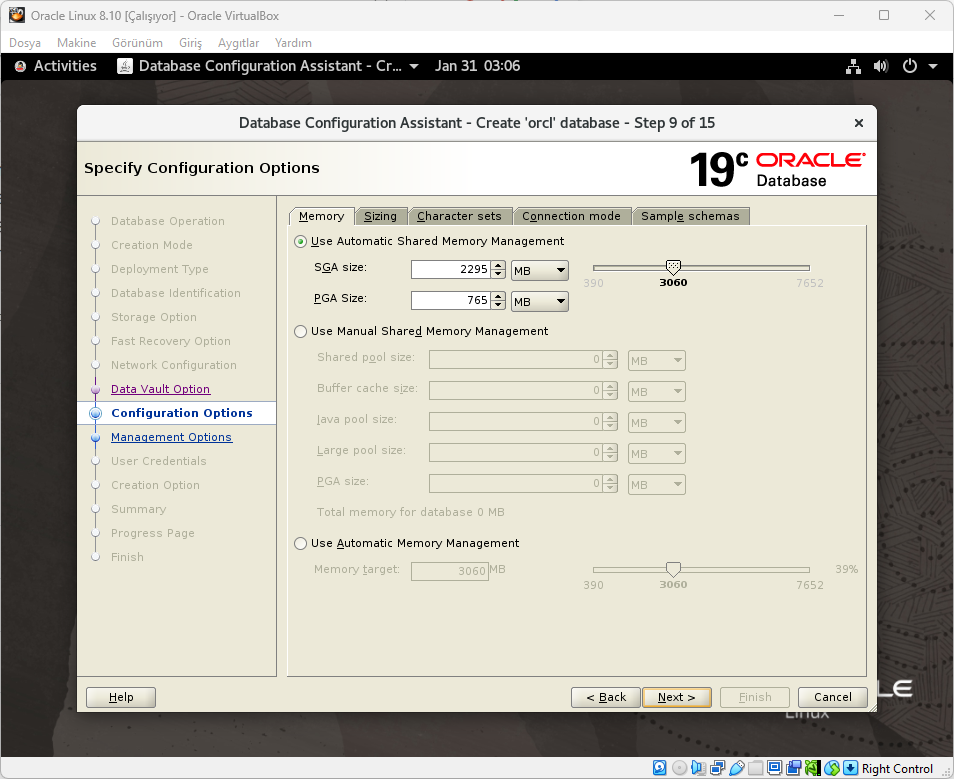
We proceed without making any changes to the "Sizing" tab on the same page.

On the "Character sets" page, we determine the character set that will be used in our database. We select the "Choose from the list of character sets" option among the options above. In the "Database character set" section, we select the "WE8ISO8859P9 - ISO 8859-9 West European & Turkish" option.

We continue with the "Dedicated server mode" option on the "Connection mode" page.

We activate the "Add sample schemas to the database" option on the last page, "Sample schemas". Thanks to this feature, a sample schema will be added to our database. After making the necessary adjustments, we continue with "Next".

On the next page, there are management-related options. Enterprise Manager (EM) Database Express, featured on this page, is a simple tool with which you can monitor and manage the Oracle database over the web. It is used for basic tasks such as performance monitoring and tuning. Since we will not use it, we deactivate the "Configure Enterprise Manager (EM) database express" option and proceed with the "Next" button.

On the next page, we need to set passwords for "SYS" and "SYSTEM" users, which are database administrator users. Since we will use the same password for both users here, we select the "Use the same administrative password for all account" option and continue the installation by typing the password we have chosen in both boxes and clicking "Next".
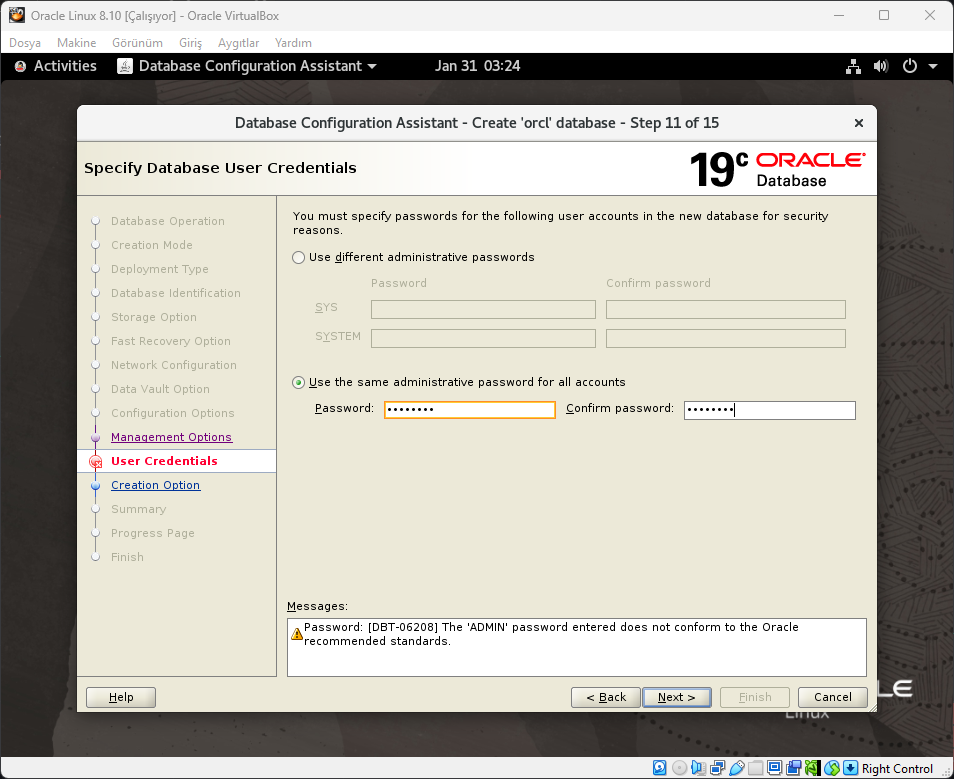
If the password you specify does not meet Oracle's recommended password requirement, you may receive a warning. You can continue the installation by selecting the "Yes" button in this warning window.

On the page that is the last stage of the installation, we are asked to make a choice regarding the creation option. On this page, we select the "Create database" option and continue to the summary page by clicking "Next".

In the next window, a summary page appears listing the choices we made. Here we can make a brief check on how our database will be set up according to the options we choose. If you do not notice anything negative, we can complete the installation by clicking the "Finish" button.


On the next page, the installation of our database begins. At this point, we should not receive any errors unless a mistake is made in the steps. After the installation is completed, we complete the database installation by selecting the "Close" button on the page that appears.


Let's go back to our terminal application and test that everything is great by connecting to the database with SQL*Plus.
[oracle@localhost ~]# . .profile_db
[oracle@localhost ~]# sqlplus / as sysdba

SQL> SELECT DBID, NAME, OPEN_MODE FROM V$DATABASE;

	  DBID	NAME		OPEN_MODE
-----------  --------- ---------------
1719594913	ORCL		READ WRITE

SQL> SHO PARAMETER NAME


Comments